Best Lead Capture Qualification Tools Compared
| Software | Key Features | Starting Price | Personal Rating | Best For |
|---|---|---|---|---|
meetergo | Premium video booking pages, round robin, and routing forms; appointment booking pages and workflows | Free €0 forever; Premium for routing | ⭐⭐⭐⭐ 4.5/5 | Businesses that seek to automate meeting scheduling through appointment booking pages. |
Softwaremeetergo Key FeaturesPremium video booking pages, round robin, and routing forms; appointment booking pages and workflows Starting PriceFree €0 forever; Premium for routing Personal Rating⭐⭐⭐⭐ 4.5/5 Best ForBusinesses that seek to automate meeting scheduling through appointment booking pages. | ||||
Hubspot Sales Hub | Sales workplaceTarget accountsSequencesActivity fieldForecastSales analytics | Free | ⭐⭐⭐⭐ 4.6/5 | Small and large businesses seeking to create workflows and targeted cold emails to many leads. |
SoftwareHubspot Sales Hub Key FeaturesSales workplaceTarget accountsSequencesActivity fieldForecastSales analytics Starting PriceFree Personal Rating⭐⭐⭐⭐ 4.6/5 Best ForSmall and large businesses seeking to create workflows and targeted cold emails to many leads. | ||||
Apollo.io | B2B prospecting dataMeeting schedulerPre-meeting insightsAI AssistantsCRM enrichmentCall recorder and insights | Free | ⭐⭐⭐⭐ 4.5/5 | Sales teams that seek to automate lead prospecting and qualification with advanced filtering. |
SoftwareApollo.io Key FeaturesB2B prospecting dataMeeting schedulerPre-meeting insightsAI AssistantsCRM enrichmentCall recorder and insights Starting PriceFree Personal Rating⭐⭐⭐⭐ 4.5/5 Best ForSales teams that seek to automate lead prospecting and qualification with advanced filtering. | ||||
Kommo | LeadChatWhatsAppCalendarEmailStats | $15 per /month | ⭐⭐⭐⭐ 4/5 | Small and large businesses seeking to manage customers’ interactions with channels like Telegram and WhatsApp. |
SoftwareKommo Key FeaturesLeadChatWhatsAppCalendarEmailStats Starting Price$15 per /month Personal Rating⭐⭐⭐⭐ 4/5 Best ForSmall and large businesses seeking to manage customers’ interactions with channels like Telegram and WhatsApp. | ||||
Bardeen | Magic BoxCRM enrichmentAI web scraperAI message generator | Free trial | ⭐⭐⭐⭐ 4/5 | Marketers who seek to create custom, multi-step forms with advanced logic to capture and qualify leads efficiently |
SoftwareBardeen Key FeaturesMagic BoxCRM enrichmentAI web scraperAI message generator Starting PriceFree trial Personal Rating⭐⭐⭐⭐ 4/5 Best ForMarketers who seek to create custom, multi-step forms with advanced logic to capture and qualify leads efficiently | ||||
Intercom | Fin AI AgentOmnichannelHelp CenterInboxCopilotTicketing | Free trial | ⭐⭐⭐⭐ 4/5 | Small and large businesses seeking to create chatbots to qualify leads and also engage with customers with a built-in chat feature |
SoftwareIntercom Key FeaturesFin AI AgentOmnichannelHelp CenterInboxCopilotTicketing Starting PriceFree trial Personal Rating⭐⭐⭐⭐ 4/5 Best ForSmall and large businesses seeking to create chatbots to qualify leads and also engage with customers with a built-in chat feature | ||||
Fillout | FormsSchedulingWorkflowsPDFPayments | Free | ⭐⭐⭐⭐ 4/5 | Businesses looking to qualify leads through forms, surveys, and booking pages. |
SoftwareFillout Key FeaturesFormsSchedulingWorkflowsPDFPayments Starting PriceFree Personal Rating⭐⭐⭐⭐ 4/5 Best ForBusinesses looking to qualify leads through forms, surveys, and booking pages. | ||||
Salesforce Sales Cloud | AgentforceAnalyticsCPQRevenue intelligence | Free trial | ⭐⭐⭐⭐ 4.5/5 | Businesses looking to centralize qualified leads’ data, schedule tasks, and track deals. |
SoftwareSalesforce Sales Cloud Key FeaturesAgentforceAnalyticsCPQRevenue intelligence Starting PriceFree trial Personal Rating⭐⭐⭐⭐ 4.5/5 Best ForBusinesses looking to centralize qualified leads’ data, schedule tasks, and track deals. | ||||
SurveyMonkey | FormsSurveys25+ question typesPaymentsSurvey scoreSurveyMonkey Genius | Advantage Annual - $34/ per user | ⭐⭐⭐⭐ 4/5 | Small and medium businesses looking to collect qualified leads through online forms and surveys |
SoftwareSurveyMonkey Key FeaturesFormsSurveys25+ question typesPaymentsSurvey scoreSurveyMonkey Genius Starting PriceAdvantage Annual - $34/ per user Personal Rating⭐⭐⭐⭐ 4/5 Best ForSmall and medium businesses looking to collect qualified leads through online forms and surveys | ||||
Zoho Bigin | Pipeline managementAutomationMulti-channel communicationFormPayment linksBooking pages | Free | ⭐⭐⭐ 3.8/5 | Small businesses wanting to create forms to collect data and manage their leads’ pipeline effectively |
SoftwareZoho Bigin Key FeaturesPipeline managementAutomationMulti-channel communicationFormPayment linksBooking pages Starting PriceFree Personal Rating⭐⭐⭐ 3.8/5 Best ForSmall businesses wanting to create forms to collect data and manage their leads’ pipeline effectively | ||||
According to Forrester, the typical conversion rate from inquiry to won of a lead-centric process is less than 1%.

This statistic is alarming, but here are two problems that I have found to be possible causes of this outcome:
- Most businesses don't close many deals because they lack a clear system for it.
- If they already use lead qualification software, it may not be the right one for them.
In this article, I wanted to focus on the software issue. For the past fifteen days, I've tested over nine lead qualification tools, and in this article, I'll recommend the top five. I will show you how to choose the right lead qualification tool for your business.
Keep reading to find out more.
10 Best Lead Qualification Tools
1. meetergo
Personal rating: ⭐⭐⭐⭐ 4.6/5 stars | Starting price: $0 | Integrates with Google Calendar, Outlook, Zoom, HubSpot | Best for small teams | Ideal for meeting qualification
meetergo comes at the top of our list as the best lead qualification tool.

Thanks to its Premium routing and Premium Funnels feature, you can create a funnel by naming it and choosing the type. After making it, you can access a pre-built form that helps you collect a lead’s information, such as their name, email address, and phone number.

You can create more fields in the form to add questions using the text input or multi-line input as your field type.
meetergo also allows you to create booking pages by giving a title, adding a short description, choosing the meeting duration, and selecting the venue. You can choose a single-host meeting or a team meeting with multiple hosts.

The Premium analytics feature shows you the number of completed events over a specific period (e.g, the last 30 days). You will also see your popular bookings and even the popular times people love to book.

What’s more, using meetergo’s Workflows, you can set up meeting reminders by selecting the time (e.g, before the meeting starts), and how long before the meeting begins (e.g, 5 minutes). You can also edit the email template that meetergo already provides for you.

The first step in your lead qualification process is to collect the leads’ information. meetergo allows you to do precisely that, and it's simple.
On your account homepage, go to the ‘Tools’ tab and select ‘Routing forms & Funnels’.

Next, click the ‘Create’ button.

Now, name your form and choose the funnel type you prefer.

The default form collects the name, email, and phone number. You can delete or edit it.

You can toggle on the option to collect your lead's first and last names.

You can also add new fields to collect more information about your lead by clicking ‘Create new field’ and choosing ‘Text input’ as field type.

For instance, if I want to know my lead's company size and job title, I can enter that question as the field label. This information will help in the qualification process.

Next, save your new data field. The new field will immediately appear in your original form.

This method of collecting information with meetergo is straightforward and user-friendly. Now, let’s look at the other features that make meetergo your best option for a lead qualification tool.
Stop Wasting Time on Unqualified Leads!
With Meetergo, you can qualify, route, and book your best-fit prospects automatically—before the first call even happens. Let sales focus on selling, not filtering.
Try meetergo for free today!
Booking + video conferencing in one tool.
Booking + video conferencing in one tool.
Key Features
1 . Booking page
A booking page is essentially where your leads and customers can schedule online appointments through a digital calendar. Creating booking pages for your leads through meetergo is one of the easiest things you can do. I will show you how.
On the homepage, click the ‘New’ button and go to ‘Meeting Types’.

There are two meeting types:
- Single host
- Team
I’ll go with the first option in this illustration.

You can either choose a one-on-one meeting or a group meeting. Since I want this booking page to be for individual bookings, I will go for the one-on-one meeting.

After that, select who will host the meeting and click ‘Create Meeting Type’.

In the pop-up window, give your meeting type a title, description, duration, and venue.

Your booking page is ready! You can share it instantly or copy the link and use it later.

This is what the booking page looks like to anyone who uses the link.

2 . Workflows
The Workflows feature helps you automate notifications, reminders, or follow-up messages. This saves you a lot of time and manual effort. Let me show you how it works. I’ll create a workflow that sends a reminder message automatically when required.
Under Tools, click on ‘Workflows’.

You are creating a new workflow, so click ‘New’.

meetergo offers many workflow templates, but you can also create one from scratch. In this example, I’ll use the pre-created reminder workflow.

In the trigger section, you have to indicate when you want the reminder sent. I would like it to go out before the meeting.

Next, you must choose when exactly the trigger should go off before the meeting starts.

Further below, you will find the reminder message your attendees will receive. You can edit it to your preference.

Once everything is set, enable this workflow by selecting ‘Published’.

3 . Contacts
This feature lets you view and manage all your leads and contacts from Meetergo. Let me show you how to access it.
Under the Schedule tab, select ‘Contacts’.

meetergo displays all your contacts, including their name, email address, company, account owner, next scheduled meeting, and tags.

If you click on a contact, you will see more information about them, such as their appointment history. You can also edit or delete contacts.

These features, and more, make meetergo the best meeting scheduler software and lead capture tool.
What I admired vs What could improve
What I admired👍
✅ You can easily connect your scheduling directly to CRM systems like HubSpot and Salesforce on Premium.
✅ Has a user-friendly interface, and form setup and routing are easy even if you are a first-time user.
✅ The booking forms and routing can let you collect details like company size and meeting purpose. This helps you to pre-qualify leads.
✅ Can set up custom booking pages for different products and add tailored questions for each.
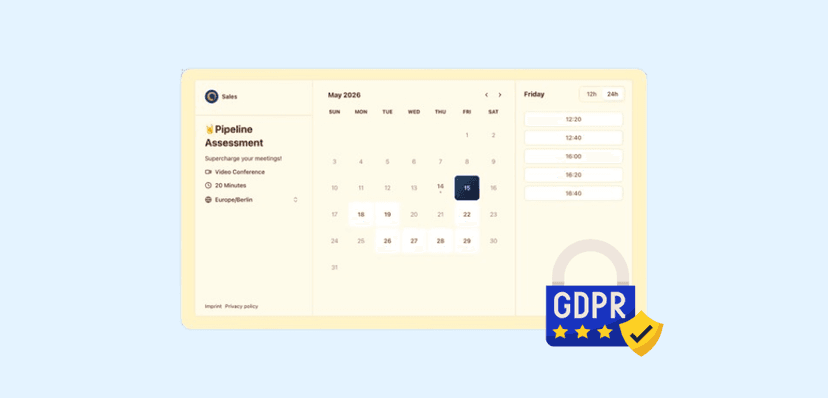
✅ Has GDPR-compliant data capture, which builds trust, especially for European clients.
What could improve 👎
❌ You can change page colors and logos, but full design control isn’t ready yet.
❌ You can add personal introduction videos to your booking page for leads, but only in paid plans.
Best for
- Businesses seeking a tool that helps sales teams collect and qualify leads through forms and booking pages.
Pricing
- Free: €0 forever, unlimited users, all 15 apps at starter limits
- Light: €9.90 per user/month, billed yearly, one app fully unlocked
- Suite: €29.90 first year, then €34.90 per user/month, billed yearly
- Premium: €49.90 first year, then €59.90 per user/month, billed yearly

Stop Wasting Time on Unqualified Leads!
With Meetergo, you can qualify, route, and book your best-fit prospects automatically—before the first call even happens. Let sales focus on selling, not filtering.
Try meetergo for free today!
Booking + video conferencing in one tool.
Booking + video conferencing in one tool.
2. HubSpot Sales Hub
Personal rating: ⭐⭐⭐⭐ 4.6/5 stars | Starting price: $0 | Integrates with Gmail, Outlook, Zoom, Slack, Salesforce | Best for mid-size teams | Ideal for lead scoring
Up next is the HubSpot Sales Hub, which features a Workspace that displays a summary of your tasks, including their titles, types, priority levels, assignees, and more.

Under Leads, you can view the total number of open leads, target accounts, recent activity, and leads that are not in sequence.

The Documents feature has a dashboard that showcases all your folders, displaying information such as the folder name, links created, views, the folder owner, and the last update date.

You can also create scheduling pages using the Meeting Scheduler feature by selecting your preferred meeting type, assigning an internal name, choosing the organizer and duration, adding the event title, location, and a brief description.

With the Sales analytics feature, you can obtain many insights, such as the number of calls and chats your sales reps make over a given period(e.g, a month). It also displays the number of meetings and tasks completed, as well as the average lead response time.

I tested Hubspot Sales Hub and found that you can create your workspace and manage all your leads from there. Let me take you through the process.
On the sidebar of your homepage, locate and click on the Sales icon and open the ‘Sales Workspace’.

The ‘Leads’ tab opens up a window where you can create and add your b2b leads.

If your lead is a contact or company, indicate it and complete the rest of the form.
You must specify their name, the pipeline, stage(e.g., new), type, and label(e.g., hot, cold, or warm). After providing all the necessary details, click the ‘Create Lead’ button.

Great! Now you have successfully created your first lead.

To edit or adjust any of the information, you can click the field and make the change right from there.
For instance, I clicked on the Lead Label field and realized I could update the label at any point in time.

Under Summary, you can reach out to your newly created lead.

There are various ways you can contact leads. On your newly assigned lead’s page, click ‘More activities. You should see all the available actions that allow you to enroll in a sequence, make a phone call, create an email, create a task, and schedule a meeting.
Let me create an email for my new lead to illustrate.

First, I’ll choose a recipient and a sender. Then I’ll write the subject and the message. I can format the email content and add media attachments, such as images, documents, and other files.
I’m satisfied with the contents of my email, so I’ll click ‘Send’.

This is what the email will look like on my lead’s end:

Feel free to try out other ways to reach out to your leads when you're ready. In the meantime, let’s test other features in the Hubspot Sales Hub.
Key Features
1 . Activity feed
This feature lets you see and review a list of your sales notifications. It also gives you more insights about your leads, revealing who did what and when.
In the Sales hub, go to “Activity feed”.

The interface shows you important details about your leads. For example, this screenshot shows that one of my leads has already opened the email I sent him. It also shows how often he opened the email and displays the date and time the action took place.

There is more. You can take actions from there: call, email, create a task, and more.

The ‘More’ button gives you many options, such as creating notes, scheduling, turning off thread notifications, and deleting an activity bundle.

2 . Meeting Scheduler
You can also create scheduling pages using Hubspot's meeting scheduler feature. These will allow your leads and prospects to book appointments with your team.
Let’s see how to create one. From the sales hub menu, go to ‘Meeting Scheduler’.

Click ‘Create scheduling page.’

You can choose a one-on-one, group, or round-robin meeting type. I’ll select the one-on-one meeting type for this example.

Next, give an internal name, select the organizer, name the event, choose a location (e.g., Zoom), and add a description.

The next page displays all the information about the scheduling page, including the link, title, meeting duration, and availability options. On the right side, you can also preview your booking page.
After configuring the scheduling settings, the next stage is the automation. You can enable these two options based on what you prefer:
- Confirmation email(right after they schedule a meeting)
- Pre-meeting reminder (before a meeting starts)

This is what the booking page looks like on your attendees’ end.

When your attendee schedules a meeting via the booking page, they will receive a confirmation email about the meeting they booked.

3 . Sequence
This feature allows you to send a series of targeted emails to nurture your leads over time. HubSpot offers pre-built sequences, but you can also build your own from scratch.
Go to ‘Sequences’ under your sales hub.

Click ‘Create sequence’.

As mentioned earlier, templates are available, but let’s build one from scratch.

Next, choose the first action the sequence will perform. I chose an automated email as the first action.

Now let’s create our template.

Select the email type, what you are selling, the target audience, and add a short description. With that information provided, proceed to generate the email.

After generating the email, I selected my target contacts.

The good news is that the email was automatically sent to my leads as planned.

What I admired vs What could improve
What I admired👍
✅ Logs every interaction with your leads so you can see their journey.
✅ The lead scoring is well designed so that I could easily assign points based on behaviours like page visits.
✅ Has meeting links and templates tied directly to contact records. Whenever there is a booked call, the lead status gets updated.
✅ Has a detailed visual deal board that makes it easy to spot which leads are moving through the funnel and which aren’t.
What could improve 👎
❌ It has powerful custom automation rules, but the setup might feel difficult if it's your first time.
❌ Lead-related tools like predictive scoring are only available in paid tiers.
Best for
- Small and large businesses seeking to create workflows and targeted cold emails to many leads at the same time.
Pricing
- Free tools: $0
- Sales Hub Starter: $15/month/seat
- Starter Customer Platform: $15/ monthly/seat
- Sales Hub Professional: $90/month/seat
- Sales Hub Enterprise: $150/month/seat

3. Apollo.io
Next on our list of the best lead qualification tools is Apollo.io.
Personal rating: ⭐⭐⭐⭐ 4.5/5 stars | Starting price: $0 | Integrates with HubSpot, Salesforce, LinkedIn, Outreach | Best for medium teams | Ideal for lead enrichment

It features a People section that allows you to search for leads using various filters, such as job title, company, location, industry, and keywords. You can even enable advanced filters to access their verified emails and phone numbers.

Apollo’s Home dashboard displays daily prospect recommendations and email stats, which include the number of emails sent, delivered, opened, replied, and bounced for the current month. However, you can always change the period.

Moreover, Apollo’s AI helps you create targeted and personalized emails by providing it with your website URL and selecting contacts. You can manually configure the AI by adding your company name, customer pain point, value proposition, CTA(call to action), company overview, additional context, primary competitors, and product differentiators.

What’s more, the Deals feature allows you to track and create deals by naming them, selecting the company, pipeline, stage(negotiation), estimated close date, owner, and amount.

As I mentioned earlier, Apollo lets you search for leads using the people feature. I will show you how.
First and foremost, select ‘People’ from the feature menu.

This brings up a number of filters that you can use to narrow your search results by job titles, companies and lookalikes, locations, employees, industry, and keywords, among others.

When you click on ‘Job Titles’, Apollo displays a list of jobs allowing you to choose the one that fits your search (e.g., manager).

Interestingly, selecting ‘manager’ as my job title filter resulted in a comprehensive list of people in that position.

Then I decided to test the location filter as well.

With the location filter, you can refine your search further by specifying the regions relevant to your search. If you want to find managers within the United States, for instance, all you need to do is select it, and Apollo will do the rest.

Another handy feature is the Apollo email status, which shows you when it is safe to send emails(verified), when to send with caution(unverified), and when you must not send at all(update required or unavailable).

Moving on, under the same filter section, you can find the ‘Buying Intent’ feature, which helps you find companies with an active interest in products and services that you provide.
To explore this tool, click on ‘Get Started’.

Now it’s time to choose your topic of interest by inserting it in the search bar. Let’s go with ‘Sales Software’.

The option I selected opened up a list, which indicates that Apollo wants you to be more specific before it performs a search. I chose ‘CRM Software’.

You should see instant results in the top right corner regarding the number of companies interested in your product or service. About 13.7K companies showed interest in CRM software.

There is still a lot more you can explore under the People feature. However, let’s take a look at other features Apollo has to offer.
Key Features
1 . Company
The Company feature works the same as the People, but the only difference is that it focuses more on companies rather than individuals.
To check it out, go to ‘Companies’.

You can start with the industry & keywords filter. I chose marketing & advertising.

You can also filter the location by choosing your preferred search region.

The ‘Employees’ filter will allow you to see the number of employees in the company.

The results were outstanding, as you can see in the screenshot below. It shows companies with their number of employees and the industry and location I asked for.

2 . Meetings
Meetings is the feature that allows you to create booking pages so that your leads can easily schedule meetings with you. Let’s create one.
On the sidebar, go to ‘Meetings’.

Next, click the ‘Create’ button in the top right corner of your screen.

You should see the various available meeting types.
- Single
- Multi host
- Round robin host
- Inbound router setup
- Intake forms
Let’s look at the Multi-host type.

Give a name and duration, and add a description of the meeting.

Afterwards, ensure that you set up your availability.

Below, set the Booking Limit (the number of bookings allowed per day). Once set up, Click ‘Create meeting’.

This is the booking page your leads will see when they book an appointment with you.

3 . Emails
Apollo’s emails feature allows you to view who clicked and opened your emails and when they did. One interesting thing is that you can create your email template to attract leads in a very special way.
Let’s see how you can do that. First, select ‘Emails’ from the menu.

Since there are no email templates, we will create one.

On the left side of the interface, craft your email by adding a name and tags, choosing the owner, and writing the subject and body. The right side just shows a preview of your email.

Your template is ready. This is how it appears in your leads’ inbox.

What I admired vs What could improve
What I admired👍
✅ Search filters allow you target leads who recently changed jobs or showed intent around your keywords.
✅ The enrichment system brings back verified emails, job titles, and company tech stacks. This makes them pre-qualified.
✅ Offers a smarter Chrome extension that can collect contact data directly from LinkedIn and send it into your sequence.
✅ Has advanced sequence analytics feels advanced and can show when prospects engage most. This helps you focus on warmer leads.
✅ It comes with a built-in A/B testing for messages. This helped me to know how to qualify leads faster.
What could improve 👎
❌ You’ll have to spend credit first to get a lead detail.
❌ The report it gives focuses more on outreach. I did not get how the leads progress.
❌ Aside from major CRM like HubSpot or Salesforce, you will have to link other CRM through third-party connectors.
Best for
- Businesses seeking to automate outreach and search using robust filters.
Pricing
- Free: $0
- Basic: $49/ per user, per month, billed annually
- Professional: $79/ per user, per month, billed annually
- Organization: $119/ per user, per month, billed annually

4. Kommo
Personal rating: ⭐⭐⭐⭐ 4/5 stars | Starting price: $15/user/month | Integrates with WhatsApp, Instagram, Telegram, Google Workspace | Best for small teams | Ideal for automating conversations with leads
Kommo ranks next on this list of the best lead generation and qualification tools.

Its Leads page displays the number of leads who made a new enquiry, were qualified, booked calls, are preparing proposals, sent a proposal, followed up, are in negotiation, and sent an invoice.

You can add more leads by choosing the client’s type, industry, goal, budget, payment method, lost reason, contact number, date, and payment. Here, you can also add the company name, work phone, email, and position.

Additionally, the Chats feature lets you create bots that will capture leads who want a call from channels like WhatsApp. When a lead types a keyword like "Let’s talk," the bot asks when they want to talk, then proposes to either get a call ASAP or schedule one. Later, it asks for the lead’s number or shares a booking link.

Additionally, the Chats feature all your conversations from all your connected channels in one unified dashboard. You can see the lead's name, the day and time the message was sent, and even reply from there.

Lastly, you can create tasks using the Calendar feature by setting your To-do for today and tomorrow. You will name the task, choose an assignee, and determine whether it is a follow-up or a meeting. You can also add results to your tasks or even delete them.
Without wasting much time, I will show you how to create and automate leads on Kommo.
On the sidebar, click ‘Leads’.

Then click on the ‘New Lead’ button at the top right corner of your screen.

Next, add your lead’s details, which include the Sale, Client type(e.g., individual), industry, budget, payment method, Lost reason(e.g., pricing concerns), contract date, and payment.

In the field below, enter their company name, work email, phone, and position.

And there you have it, you have created a new lead.

Now, let’s take a look at how to automate our workflows using the ‘Automate’ button.

First, go to ‘Add source’.

Kommo proposes various lead sources you can use. In my case, I’ll choose Telegram.

After selecting your preferred lead source, you should see it under Kommo’s demo source. The connection to Telegram was successful, and my chatbot “Johnny” is now available.

Next, I started a trigger under the incoming leads. This is how it goes:
- For all incoming leads, my chatbot will ask them to subscribe to my newsletter.

I tested my Telegram Chatbot, Johnny, and the reply was instant. It automatically asked me to subscribe to the newsletter.

I love the fact that the chatbot’s reply was automatic and instant. This can help you get more leads faster and eventually qualify them.
Kommo has other features, and I’ll review a few.
Key Features
1 . Chats
This is one of Kommo’s standout features. It allows you to view all your various conversations with your leads from your different connected channels in one place.
Since creating a chatbot with Telegram, I noticed that all my chats automatically appear under this feature. Click the ‘Chats’ icon to see more.

You can see all your interactions with your leads. Kommo also allows you to add a different channel if necessary.

Clicking on a lead’s conversation reveals the following:
- On the right side is your entire conversation with the lead.
- On the left side is a form you can fill out to help you better identify and qualify the lead(Name, sale, type, industry, budget, and much more).

That’s not all. In addition to viewing your lead's interaction, you can chat with them from within.

2 . Dashboard
Kommo has a dashboard that gives you an overview of all your connected channels.This can help you see and track your performance.
Locate and select “Dashboard” on the sidebar.

The dashboard shows you the number of incoming messages from your connected channels over a certain period of time(e.g., a week). You can also view the number of ongoing and unanswered conversations, the median reply time, and the longest waiting time.

Below is a display of the number of won, active, and lost leads. You can also see the number of leads without tasks and the number of tasks created during the selected period(week).

3 . Calendar
This Calendar feature on Kommo is not about booking appointments. It helps you see and schedule your tasks for the day and the next. This can assist you in staying on track with your leads’ follow-up.
To use it, click on ‘Calendar’.

The interface showcases your overdue tasks, to-do today, and to-do tomorrow.

However, to create a new task, click “New Task” at the top right corner of your screen.

I created a new task for ‘Tomorrow’. I first added the lead, then the assignee, and finally, the reason for the follow-up.

The task appeared right under the ‘To-do Tomorrow’ section.

With this reminder, I can follow up on my leads easily.
What I admired vs What could improve
What I admired👍
✅ Allows you to turn every WhatsApp, Instagram, or web chat inquiry into a CRM lead.
✅ Has a detailed visual pipeline that shows you where each lead stands. For example, their first message to payment.
✅ Has contact cards that can gather and store leads' conversations across channels. This will give your rep more context to engage leads.
What could improve 👎
❌ You might get lost in setting up bots and adding questions, especially if you lack experience or it's your first time.
❌ Some integrations require manual linking, especially with non-native tools like Jotform and Zoho.
Best For
- Small and large businesses seeking to manage customers’ interactions with channels like Telegram and WhatsApp.
Pricing
- Based: $15 per user/month
- Advanced: $25 per user/month
- Enterprise: $45 per user/month

5. Bardeen
Personal rating: ⭐⭐⭐⭐ 4.5/5 stars | Starting price: $99/month | Integrates with LinkedIn, Notion, Airtable, HubSpot | Best for small teams | Ideal for lead enrichment
Next on our list of the best lead qualification tools is Bardeen.

Bardeen is an automation and workflow platform that helps you find and qualify leads by choosing a source such as LinkedIn, Apollo.io, or Crunchbase, selecting your outreach channel, and where to store your leads (e.g., Hubspot).

The Explore feature lets you use pre-built automations with triggers and actions, such as receiving a Slack notification when adding a Notion page.
You can create one-time automations called playbooks by telling the AI what to automate (e.g., "Summarize this email for me.") Under the playbooks feature, you will see all your created automations, including the day and time they were automated.

What’s more, you can schedule Autobooks by choosing the days they should run or be triggered by giving them an action when something happens (e.g., "Summarize my meetings after they end.").

Now that you know what playbooks are, let’s create one. First, click on the playbooks icon on your account homepage. This opens up a window showing all the available options you can start from based on what you plan to use the playbook for.

Let’s look at the first option: Lead Sourcing & Outreach.

First, choose where you want to source your leads. It could be LinkedIn, Apollo.io, or an existing spreadsheet. I chose LinkedIn in this case.

Now select the sources you want Bardeen to explore for additional data.

For privacy and security reasons, Bardeen will seek permission to use AI to qualify leads. Click ‘Yes’ to proceed.

Next, select the outreach channel (e.g., Hubspot)

I chose this goal for my lead sourcing and outreach playbook: to extract data from the LinkedIn people search results page for the given keywords.

Then I added a few keywords: Software, Saas, Sales, Content.

Bardeen’s AI will ask you a few questions to understand the nature of your business, the products and services you offer, and your target customer profile. You can skip these questions if you want to.

Below was the first result from Bardeen based on my ICP (Ideal Customer Profile).

Clicking on the contact took me right to my HubSpot, which displayed more information about the actions I can take (email, Note, Call, Task, Meeting, etc.).

This was quite practical, and it pushed me to test other features.
Key Features
1 . Explore
The explore feature on Bardeen comes with endless pre-built automation that you can use based on your needs. For example, you can send an email to your Salesforce contact right from within Bardeen.

Once you connect your Salesforce account, your contacts will appear. Choose the contact you want to engage.

Now that you have your contact information, write the email's subject (e.g., Quick follow-up).

Then, add the body of your email.

That’s it! Bardeen takes care of the rest. Once your email is ready, you can view it.

This is what the email looks like on the recipient’s end:

It was as if I had composed the email from Gmail, but I could do it all from within Bardeen.
2 . Playbooks
As you know, playbooks are automated workflows that run based on the instructions you give.
Your list of playbooks will appear when you go to ‘Playbooks,’ located on the platform's sidebar.

By clicking the three dots icon, Bardeen will give you various options, such as checking details, renaming, resetting, duplicating, and even deleting the playbook.
Let’s look at the details of the playbook I created earlier.

Bardeen shows everything about the playbook, including the name, and other actions I can carry out. When you view the details of your playbook, you should see similar actions.
Among these actions are:
- Remove
- Duplicate
- Modify in studio
- Share

There is more to it! Below, you will also see who created your playbook and when it was last updated.

What I admired vs What could improve
What I admired👍
✅ Bardeen does not require code. It gets you leads from LinkedIn to your CRM with just a click.
✅ Can easily flag only profiles that match a target role to qualify leads with its playbook feature.
✅ Can capture enriched data. These data come with extra company details, like website and employee count.
✅ Can integrate well with tools that make it easy to pass qualified contacts, like Notion, Google Sheets, and CRMs.
What could improve 👎
❌ A more detailed dashboard where you can monitor metrics and performance of your playbooks would be great.
❌ It relies heavily on extension, so you may not have access if it's not available for your browser.
Best for
- Large businesses looking for a platform that can automate a large number of workflows and connect with many apps like Salesforce, Slack, and Hubspot.
Pricing
- Starter: $99/month, billed annually
- Teams: $500/month, billed annually
- Enterprise: $1500/month, billed annually

6. Intercom
Personal rating: ⭐⭐⭐⭐ 4.5/5 stars | Starting price: $29/month | Integrates with Slack, HubSpot, Salesforce, Google Analytics | Best for small teams | Ideal for live chat qualification
Let me share a few more lead qualification tools.

Intercom is a customer service platform with a Fin AI agent feature that creates automated workflows that collect data, such as name and email, when a customer reaches out for the first time through various channels (website, Facebook, or WhatsApp).

It has a report feature that gives you an overview of your conversations' performance, including your new conversations by channel, the Fin AI agent's involvement in percentage, the answer rate, deflection, and resolution rate.

Moreover, the outbound feature shows all the outbound messages sent from the platform with details like the title, state (e.g., live or draft), sender, content type (email, post), sent, goal, people type (user, lead), and when it was created and set live for the first time.

Last but not least, it comes with a contact feature that showcases your contacts’ names, their last seen, first seen, type of contact, when each was signed up, web sessions, and the city. You can also delete, edit, or even message your chosen contact.

As I mentioned, Intercom lets you create a live chatbot to engage with leads and collect data whenever they contact you. Here is a breakdown of how to do it.
On the sidebar, click “Fin AI Agent”.

Under the Fin AI agent, go to “Workflows”.

We will create this new workflow from scratch.

Intercom proposes various triggers. In this new workflow, we want to collect data once a lead sends their first message.

Now let’s set up our trigger. When a customer sends a message through your chosen channels (website, Facebook, or WhatsApp) for the first time, the chatbot will collect their data.

You can set the AI agent up to collect a lot of information, such as the name, phone number, email, company name, size, industry, or website. These are also known as attributes.

For example, I selected ‘Email’, and I could immediately see it get added to my trigger.

However, you should note that you cannot select many fields at once. After creating this live agent, I needed to see what else Intercom has to offer.
Let’s review more reasons that make Intercom one of the top lead qualification tools.
Key Features
1 . Contact
Having a contact list now is crucial for many reasons. It helps you track all your leads, engage with each one accordingly, organize them, and even prioritize who to follow up with.
To add a new contact, go to “Contact” on the sidebar.

In the new window, click the ‘New users or leads’ button and select ‘Create new lead’.

Now add your lead’s name and email address.

On the left side of the interface, you can add more information about the lead, such as their location, phone number, company name, size, and website. Alternatively, you can start engaging with the lead by clicking “New conversation.”

This is what the email you are sending to your lead(s) will look like:

This is a quick way to engage with your lead from within the platform, but the limitation is that you have to install Messenger on your site or app to send these emails.
2 . Inbox
The inbox feature is where all your messages will appear. You can see them from various connected channels. You can also chat with your leads right from the Inbox interface.
Select the “Inbox” feature on the sidebar.

One interesting thing I noticed is that Intercom shows you where the messages are coming from in the Inbox. For instance, I could differentiate the inbox messages from WhatsApp from those from email and Messenger.

By clicking the three-dot menu within the built-in Messenger app, you can manage participants, merge, create a new conversation, and export a conversation.
Let me start a new conversation.

I could choose the recipient of my message, provide the subject, craft my message as I wanted it, and then send it.

What I admired vs What could improve
What I admired👍
✅ Has a chatbot that helps qualify leads. You can let it ask questions like company size or budget.
✅ The target rules let you set a chat that triggers for high-intent visitors only. For example, when a lead visits your pricing page.
✅ Can sync leads, conversations and their stages into your connected CRMs on its own.
✅ The chatbot captures conversation details with leads for your reps to see. This prevents repetition when they engage the lead.
What could improve 👎
❌ You'll have to purchase paid plans to access advanced automation like branching logic in chat.
❌ You might struggle to use if you are not tech savvy.
Best for
- Small and large businesses seeking to create chatbots to qualify leads and also engage with customers with a built-in chat feature.
Pricing
- Essentials: $29/per seat/month, billed annually
- Advanced: $85/per seat/month, billed annually
- Expert: $132/per seat/month, billed annually

7. Fillout
Personal rating: ⭐⭐⭐⭐ 4/5 stars | Starting price: $0 | Integrates with Airtable, Notion, Slack, Google Sheets | Best for small teams | Ideal for form-based qualification
Next on our list of popular lead qualification software is Fillout.

Fillout is an online tool that helps you create forms by naming them and choosing your preferred fields, such as email input, short answers, or multiple-choice questions. You can also delete or duplicate questions, and change the field type.
With its Scheduling feature, you can create booking pages by choosing a meeting type (e.g., one-on-one or group meeting), choosing a meeting title, event duration, and meeting location, and then naming the form.

In addition, you can set your availability by giving it a name, choosing a timezone, and selecting the days and times you start and finish work (e.g., Monday through Friday, 9:00 am - 5:00 pm). You can always edit it.

What’s more, using the Workflows feature, you can create notifications such as “thank-you” emails by choosing the forms or booking pages to which they must be applied. In the trigger, the platform will automatically send a thank-you message when a form is submitted. You can also send customizable emails.

Without wasting time, I want to show you how to create a form to help you qualify your leads.
On your account homepage, click on “Make a Fillout.”

You can create one from scratch or use a template.

There are several templates available on the platform. Choose the one that suits you best.
I decided to go with the “Newsletter Signup Form” Template.

You can always change the default name of your form. After renaming the template, click “Continue”.

You can customize the template using the available fields on the left side of the interface.

Once everything checks out well, go to “Publish”.

With your form now published, you can copy the form link and share it or embed it on your website.

Once a lead contacts you, the form you created will be used to collect information.

And voila! A lead just signed up.

Key Features
1 . Scheduling
Fillout’s Scheduling feature allows you to create booking pages that let your leads schedule appointments without wasting time.
Under Scheduling, go to “Get started”.

There are four meeting types the platform offers:
- One-on-one
- Group meeting
- Collective meeting
- Round robin
I decided to explore the One-on-one meeting type in this illustration.

Choose a title and event duration, and add a location. Filling will provide your meeting link. Finally, create your meeting.

This is the booking page your leads will see when trying to schedule a meeting with you.

2 . Integration
It is no longer surprising to see Integration as part of a tool’s features. In fact, the opposite would be a surprise. And Fillout is not left behind. It integrates seamlessly with many apps. Let’s take a look at a few.
On the home screen, search for “Integrations” and click on it.

You will see that Fillout can integrate with various apps, including preferred CRMs like Hubspot.

This is an advantage because it will help you save time by automatically sending form responses directly to your Hubspot.

What I admired vs What could improve
What I admired👍
✅ The form feels modern, and its conditional logic lets you show extra fields to leads when they meet a criteria.
✅ Has an intuitive interface, so you can easily create a form even if it's your first time.
✅ Whenever a lead submits a form, it can automatically pass through connected tools like Notion and the rest of the qualification fields.
✅ Comes with a built-in drop-off tracker, which shows where leads abandon the forms which can help you improve the capture steps.
What could improve 👎
❌ Setting up the form may be easy, but the advanced logic seems difficult if you lack experience.
❌ The free tier lacks customisation options, so creating a professional lead capture form is limited on this tier.
Best For
- Businesses looking to qualify leads through forms, surveys, and booking pages.
Pricing
- Free: $0/month
- Starter: $15/month
- Pro: $40/month
- Business: $75/month

8. Salesforce Sales Cloud
Personal rating: ⭐⭐⭐⭐ 4/5 stars | Starting price: $160/month | Integrates with Outlook, Gmail, Zoom, Slack, HubSpot | Best for large teams | Ideal for automated lead scoring
The next tool on this list of lead qualification software is Salesforce’s Sales Cloud.

You can create contacts and leads on Salesforce Sales Cloud by choosing their salutation (e.g., Mr. or Mrs.), adding their first and last name, company, title, website, description, and choosing the lead’s status (e.g., New or qualified).

Salesforce Sales Cloud also lets you create your product via the Sales feature by adding the product name, code, family, and SKU (Stock Keeping Unit). You must also add a description.

There is more! You can track all customer support in one place using cases under the Service feature. You can view the case number, contact name, subject, status, priority, date & time opened, and the case owner alias.

Furthermore, under Analytics, you can create reports by choosing a report type (e.g., lead), and the platform will generate a report accordingly. This feature also displays the name, title, company, lead source (e.g., external referral), rating, and lead owner.

The Home dashboard allows you to take a few quick actions. One such action is “creating leads,” which is what we will do.

On the following page, click the “Add a lead” button.

Enter your lead’s personal information, such as their name, phone number, company, title, website, status, etc.

Your lead has been created! You can edit or update the information at any time. At the top right corner of your screen, click “converted” and “select converted status”.

Salesforce wants you to convert your leads into opportunities to show they are now potential customers with a higher chance of closing a deal. Choose the converted status (qualified), and click “convert”.

As you can see, your lead has now been converted.

Now let’s discuss a few other features.
Key Features
1 . Home
Each platform comes with its unique touch. The home dashboard on Salesforce Sales Cloud already displays your lead stage, opportunity stage, and contact details.

Interestingly, you can even view any section's report from there. For example, reports are available under “My Leads” and “My Opportunities”.

The report shows analytics regarding the leads (the total number). Also, at the bottom, you can see a list of leads including their details (name, email, status, etc.)

2 . Cases
Cases help you track customer support in one place. They represent the customer’s questions, issues, or feedback.
Let’s create one.

Clicking “New” will open a New Case, where you can provide the case, contact, and description information.
After creating a case, you can view its number, subject, status, date and time of opening, and the case owner's Alias.

What I admired vs What could improve
What I admired👍
✅ Allows you to set it up to route leads automatically to the right rep based on geography, campaign, and much more.
✅ Features the Einstein lead scoring, which looks into past wins to predict which new leads are most likely to convert.
✅ Has detailed dashboards for viewing every qualification step of a lead. (e.g., from when they were captured to making a deal)
What could improve 👎
❌ Costs could go up to $500 per month if you add add-ons, AI and automation, which is pricey for small and some mid-sized businesses.
❌ The custom reports are not intuitive enough, and you may need an expert. You don't get a simple drag-and-drop builder.
Best for
- Businesses seeking to centralize qualified leads’ data, schedule tasks, and track deals.
Pricing
- Enterprise: $160/user/month, billed annually
- Unlimited: $330/user/month, billed annually
- Einstein 1 Sales: $500/user/month, billed annually

9. SurveyMonkey
Personal rating: ⭐⭐⭐ 4/5 stars | Starting price: $25/ month | Integrates with HubSpot, Salesforce, Slack | Best for small teams | Ideal for survey qualification
This list of the best lead qualification tools won’t be complete without SurveyMonkey.

SurveyMonkey is an online platform that allows you to create surveys by naming them, choosing a theme, adding your logo, inserting your questions, and choosing an answer type for each question (multiple-choice, checkbox, etc.).

The Survey collectors interface shows the total number of responses and response notifications. You can collect responses to your surveys from various sources, such as a web link, email, website, manual data entry, and text message.

Under the insights & trends interface, you can see your total responses, completion rate in percentage, typical time spent, and the most skipped survey questions. You will also see a chart showing your responses' date and time.

In addition, SurveyMonkey integrates with conferencing apps like Zoom and Microsoft Teams, CRMs like Hubspot and Salesforce, and automation tools like Zapier.

This platform helps you create online surveys and allows you to create forms that let you qualify or disqualify leads.
On the home dashboard, SurveyMonkey asks you to choose a starting point. Of all the options, I chose a popular template.

I was impressed with the number of templates. After much deliberation, I chose the “Event Registration Form” template.

Once you have found the template you want to use, click on “Use this template”.

On the left side of the interface, I could change the theme or even create a custom one. And on the right side (the form itself), I could customize it further (edit, move, copy, or delete).

After creating your form, SurveyMonkey will ask you how you want to collect responses to your survey. There are many options available. I decided to share my link traditionally.

I shared the link with many leads, and I noticed that the form they filled out was the same as the one I created with all the details I wanted (Name, Email, Phone, Company/organization, and a few questions).

Now let’s review some other features of SurveyMonkey.
Key Features
1 . Insights
After collecting leads’ information through forms, you need to analyze the metrics to understand what works and what doesn’t.
To do that, go to “Analyze results.”

Under Insights & Trends, you can see the total responses, the completion rate, the typical time spent, and the most skipped question.

Below, you will also see the response by hour with a graph illustrating it. It shows the number of responses, date, and exact time the response came.

2 . Integrations
Integration saves you time by automating your workflows. SurveyMonkey can integrate with many apps, including marketing, email, and productivity apps.
Go to “Apps & Integrations” under the menu icon to explore the available integrations.

You will see that SurveyMonkey can connect with Hubspot, Mailchimp, and many more.

What I admired vs What could improve
What I admired👍
✅ Has a conditional logic that allows you to turn surveys into a simple qualification forms to route leads.
✅ Allows you to directly send your leads' responses to CRMs or spreadsheets, for reps to use to score them.
✅ Supports custom URL parameters, which you can use to track the source of each capture.
✅ Offers real-time reporting analytics. This can show you which lead category responds the most, allowing you to improve qualification.
What could improve 👎
❌ There is no native CRM scoring. You’ll need external logic to grade lead quality.
❌ You cannot add multiple qualification rules in the survey logic in the same flow.
Best for
- Small and medium businesses looking to collect qualified leads through online forms and surveys.
Pricing
- Team advantage: $25/user/month; starting at three users, billed annually
- Team premier: $75/user/month; starting at three users, billed annually
- Enterprise: Custom pricing

10. Zoho Bigin
Personal rating: ⭐⭐⭐ 3.5/5 stars | Starting price: $0 | Integrates with Zoho Forms, Google Workspace, Microsoft 365 | Best for small teams | Ideal for basic lead tracking
Last but not least on our list of the best lead qualification tools is Zoho Begin.

Zoho Bigin’s Dashboard feature lets you see the number of contacts created over a specific period, pipeline wins and losses, tasks created, events completed, and calls completed over that period.

Using its Contacts feature, you can create a contact form to collect leads’ data by adding fields that ask for their name, title, email, company name, mobile, and description. You can also add sections that ask for address information like country, state, city, and street.

Also, it comes with a Pipeline feature that helps you create deals by providing a deal name, company, and contact name, choosing a stage, adding the amount, selecting the closing date, and adding a description.
There is more! The interface of the Activity feature displays your task name, due date, status (e.g., Not started), priority (e.g., High), what it is related to, and the task owner. You can mark the task as high priority or completed.

Zoho Bigin also has a way of collecting information to help qualify or disqualify leads.
Let me show you how to do it. First, click “Contacts” on the sidebar.

Next, click the “+Contact” button and choose “Create a form” from the dropdown menu.

Now, click on “New Form”.

Choose the form type:
- Contact Forms
- Pipeline Forms
I’ll go for the contact forms for the sake of this test.

The left side showcases all the fields you can add to your form. For example, I want only my leads' last name, title, phone number, and email. Hence, those are the fields I will use in my form.

Once your form is completed, you can copy its link and share it on social media (Twitter, Facebook, or WhatsApp). You can also embed it on your website.

This is what the form looks like from your lead’s perspective.

This is a good starting point. Now let's explore other features.
Key Features
1 . Dashboard
The Bigin dashboard displays an overview of your performance over a certain period of time. This includes the number of contacts created, pipeline won, pipeline lost, tasks closed, events completed, and calls completed.

For example, I clicked on the first box, which is the “contacts created” this month, and I saw more information about those contacts. You will see their names, as well as the date and time they were created.

Again, if you click on a contact’s name, you will see more about them, including their email, phone number, location, tag, description, and when it was last modified.

2 . Pipeline
Every potential customer goes through various stages, from the first contact to closing the deal.
The Pipeline feature helps you create and monitor all the deals between you and your leads.
Locate “Pipelines” on the sidebar and select it.

You can create a deal by clicking the “Deal” button.

Fill in with all the information about the deal, including deal name, company, and contact name, stage (e.g., negotiation/review), amount, closing date, and description.

And there you have it. You have created a deal. There are still more actions you can take, such as:
- Collecting payment or
- Sending an email to your lead

You can now easily see your deal stage in the pipeline.

What I admired vs What could improve
What I admired👍
✅ Allows you to create a simple lead capture form focused on business. When one submits a form, it becomes a pipeline card.
✅ Comes with already built fields for stage, lead source, and deal probability. So it qualifies leads automatically when you import.
✅ Offers built-in call and email features you can use to verify lead engagement.
✅ Integrates well with the Zoho ecosystem apps like the Zoho Forms and Zoho Mail.
What could improve 👎
❌ Lacks advanced automation to score leads or route them automatically.
❌ The analytics feel limited, and you can’t compare performance across different campaigns easily.
❌ Outside the Zoho ecosystem, integrating Zoho with tools like Slack or Mailchimp is limited. They cannot perform a lot of actions.
Best for
- Small businesses wanting to create forms to collect data and manage their leads pipeline effectively.
Pricing
- Free: $0/ single user
- Express: $4.90/user/monthly/ billed yearly
- Premier: $8.40/user/monthly/ billed yearly
- Bigin 360: $12.60/user/monthly/ billed yearly

How to Choose a Lead Qualification Tool?
There are five points to consider when choosing a lead qualification tool:
- Define your lead qualification criteria
- Understand your sales process
- Check the integration between your CRM and the potential tool
- Assess automation and AI features
- Assess reporting and analytics
I am going to explain each of them in detail.
1. Define Your Lead Qualification Criteria
Defining your lead qualification criteria is the first step for a reason.
If you don’t have a clear picture of the aspects you consider before qualifying a lead, you will surely make a wrong move. So, first, define who your ideal customer is: work position, industry, number of employees, pain points, revenue, and desires.
This will help you answer this question: What makes a qualified lead for my business?
If you want to learn how to create your ideal customer profile, check out this video from Dashly.
Your lead qualification criteria can be based on:
- Behavioral triggers (actions a lead takes) include requesting a demo or signing up for a free trial.
- Firmographics (company size, location, industry, and revenue)
- Engagement, for example, downloading resources, or social media engagements (like, share, comment)
I always use one of these qualification frameworks: B.A.N.T. ( budget, authority, need, and timeline) and C.H.A.M.P. (Challenge, authority, money, and prioritization).
You could also use a custom framework based on your business's needs.
Once your lead qualification criteria are well defined, choosing the right tool for your work becomes much easier.
2. Understand Your Sales Process
Let me start with a quote from W. Edwards Deming, who was a Business theorist and economist:
“If you can’t describe what you are doing as a process, you don’t know what you’re doing”.
Edwards Deming was right. This principle applies to your sales process, too. You cannot choose the right lead qualification tool if you don’t understand or cannot describe how your sales team works.
As part of your sales process, you should collect leads through booking pages, and meetergo can help with that.
You can create forms to collect leads’ information, such as name, email, and phone number. You can even edit or delete some of the unwanted fields.

You can even add customized questions to help you qualify or disqualify the lead.

Moreover, you should also create an excellent booking page, such as the one below, to allow your leads to schedule an appointment with your sales team.

So, the tool you use must be compatible with your workflow. For that reason, you must also ask yourself the following questions:
- Does my business attract most of its leads through its website?
- Do our reps actively reach out to prospects?
Again, do not choose a tool without understanding your sales process.
For instance, if you are inbound-focused, you must use tools with web forms, landing pages, and chatbots like Typeform or Salesloft/Drift. These tools will immediately engage leads when they visit your website.
If you are outbound-heavy, you must prioritize platforms that integrate with LinkedIn and email while offering data enrichment to help you know more about your prospects. An example of such platforms is Apollo or Ocean.io.
When it comes to a high-touch sales cycle, such as business-to-business (B2B) or enterprise sales, you might need tools that offer call analysis like Convin or voice-based screeners like Qualifi.
These tools will do a great job in helping you assess lead intent and interest early in the conversation.
3. Check CRM & Tool Integration
CRMs that sync with marketing automation tools improve alignment between sales and marketing teams
In sales and marketing, one thing is for sure: your lead qualification software should not work in a silo. It must connect smoothly with your CRM tools and other platforms you use.
There are questions you need to ask yourself:
- Does it integrate natively with Salesforce, HubSpot, or Pipedrive?
- Can it sync data with your email marketing tools, ad platforms, or analytics dashboards?
- Does it support Zapier or have API access for building custom workflows?
A tool like meetergo, for instance, integrates with popular CRMs like Hubspot, Salesforce on Premium, and automation tools like Zapier.

With this integration, you can automate a lot of tasks.
For example, when a lead books a meeting through meetergo’s booking page, their info goes straight into your Hubspot CRM, and your sales team is alerted and sees the lead’s status (e.g., qualified).
Everything is done automatically.
4. Assess Automation & AI Features
Lead qualification is not just about collecting data. It’s about qualifying faster and smarter.
This is where automation and AI features come in.
Here are some of the features you could look out for in a lead qualification software:
- Lead scoring based on behavior (email clicks, site visits), firmographics (company size, industry, location), or AI predictions that detect which leads are most likely to convert.
- Automated lead routing that assigns hot leads to the right sales reps to ensure immediate follow-up.
- Chatbots or Voice AI that engage leads in real time by asking key questions as soon as someone lands on your website.
- Real-time alerts that notify your team when there is a hot lead (a lead performing a high-intent action).
5. Assess Reporting and Analytics
Studies have shown that data-driven companies increase their productivity by 63%.

This particular statistic shows the importance of data in business nowadays.
Speaking of data, can you answer these questions?
- Where do your qualified leads come from?
- What percentage of leads convert from each source?
- How long does it take to move a lead through your sales funnel?
The answers to these questions are crucial because they will help you identify areas for improvement and adjust if necessary.
For example, you must know if your best leads mostly come from LinkedIn, website forms, or ads. In the same thought, if you don’t see why it takes your team up to 40 days to move a lead from interested to qualified, you will not be able to fix it.
The tool you choose should help you understand all these insights; if not, it will be challenging to optimize your pipeline, which may cost you valuable leads.
6. Check Cost and ROI
This is the last but not the least aspect to consider.
Just because you purchased an expensive lead qualification tool doesn’t mean you will close more leads. Likewise, a less expensive one doesn’t mean it will underperform.
But of course, you must consider the cost.
Good lead qualification software should not be too expensive.

The right lead qualification tool should help you improve conversion rates and close more deals without draining all your resources.
For that reason, ask yourself:
- Does it integrate with my existing tools like Hubspot, Zapier, and Salesforce?
Or questions like:
- Will this tool save time and shorten the sales cycles?
- How long will I wait before I start seeing results?
All these questions, when answered, will help you choose the right lead qualification software.
What is Lead Qualification Software?
Lead qualification software is a tool that helps businesses identify potential customers who are likely to turn into paying customers. In other words, it allows businesses to figure out and separate leads that are most likely to buy from those that are not.
As a business, when you have a lot of leads coming in, questions you need to ask include:
- How do we identify our leads’ intent?
- How do we turn most of them into customers?
A lead qualification software will help you do this by using a combination of criteria to filter out your potential customers.
Choose the Best Lead Qualification Tool
In this article, we discussed the best lead qualification software, such as meetergo, whose Premium tier helps you collect accurate information from leads and create funnels.
Others, like HubSpot Sales Hub, Bardeen, Apollo, and Kommo, have their strengths and weaknesses. We saw their key features and pricing plans, and why they are best for.
Finally, we defined lead qualification software and shared how to choose the best one. Now is your turn to choose the tool that fits your marketing and sales process.
Stop Wasting Time on Unqualified Leads!
With Meetergo, you can qualify, route, and book your best-fit prospects automatically—before the first call even happens. Let sales focus on selling, not filtering.
Try meetergo for free today!
Booking + video conferencing in one tool.
Booking + video conferencing in one tool.