In partnership with HubSpot. This article contains affiliate links — we may earn a commission at no extra cost to you.
HubSpot's meeting scheduler lets sales teams share booking links that sync directly with the Hubspot CRM — no manual data entry, no double-bookings, and no back-and-forth emails. It ships free with every account and scales to round robin routing, group scheduling, and automated follow-ups on paid tiers.
This guide walks you through setting up the tool from scratch — connecting calendars, configuring scheduling pages, enabling team routing, and automating the post-meeting workflow.
Whether you're a solo rep or managing a 50-person sales floor, you'll have bookings running within the hour.

What Is the HubSpot Meeting Scheduler?
The meeting scheduler is a native feature inside Hubspot Sales Hub that creates shareable booking pages tied to your calendar. When a prospect picks a time slot, the platform automatically creates a contact record (or updates an existing one), logs the meeting on the deal timeline, and sends confirmation emails to both parties.
Unlike standalone scheduling tools such as Calendly or Cal.com, every booking feeds straight into your CRM pipeline. That means no CSV imports, no Zapier workarounds, and no lost leads sitting in a third-party tool your team forgot to check.
The free tier covers basic one-on-one scheduling with a single booking page. Upgrading to Sales Hub Starter ($20/user/month) unlocks team scheduling, round robin, and multiple meeting types. Professional ($100/seat/month) adds advanced routing rules and removes platform branding.

Step 1: Connect Your Calendar to the CRM
Calendar sync is the foundation. Without it, the scheduler can't read your availability or block booked slots. The platform supports Google Calendar, Office 365, and Exchange — covering virtually every sales team.
Here's how to connect:
- Navigate to Settings → General → Calendar in your account.
- Click Connect calendar and select your provider (Google, Office 365, or Exchange).
- Authenticate with your email credentials. Grant the required read/write permissions so the platform can create events on your behalf.
- Choose your default calendar for new meetings. If you manage multiple calendars, also select which ones the system should check for conflicts.
Important: Each team member must connect their own calendar individually. This isn't something an admin can do in bulk. Send your team a quick Loom or Slack message with these four steps — it takes under two minutes per person.
Two-way sync means any event added outside the CRM still blocks your scheduling page. Personal appointments, doctor visits, lunch blocks — they all register as unavailable time without exposing details to prospects.

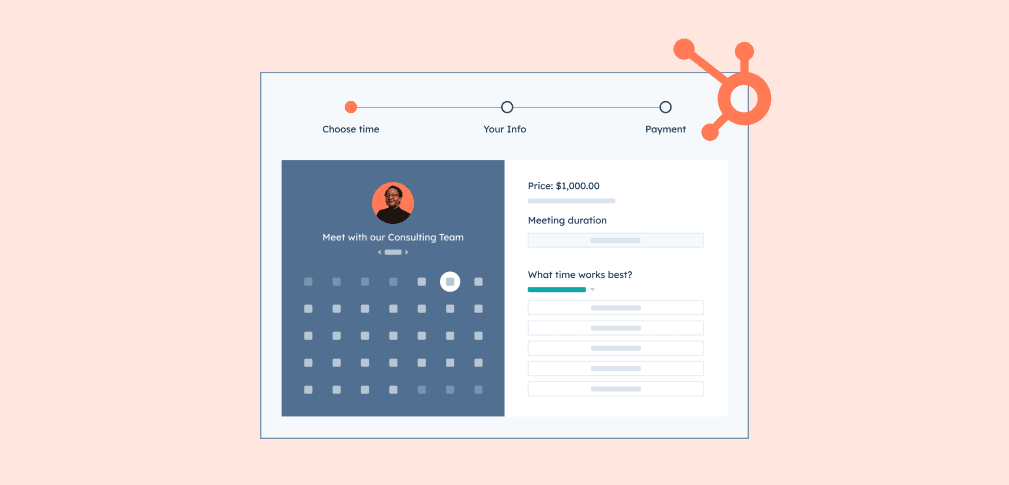
Step 2: Create Your First Scheduling Page
Scheduling pages are the booking links you share with prospects. Each page defines meeting duration, availability windows, and location (Zoom, Teams, phone, or in-person). Sales Hub lets you create multiple pages for different meeting types — a 15-minute discovery call, a 30-minute demo, a 60-minute strategy session.
To create a scheduling page:
- Go to Sales → Meetings and click Create scheduling page.
- Choose the meeting type: One-on-One (default), Group (multi-host), or Round Robin (auto-assigned).
- Set the meeting title, duration, and description. Use something specific like "15-Min Product Demo with [Your Company]" rather than generic text.
- Configure your availability — select which days and hours you're bookable. Add buffer time between meetings (15 minutes is standard) and set a minimum notice period so prospects can't book same-day calls if you need prep time.
- Pick a meeting location — Zoom, Google Meet, Microsoft Teams, or phone. If you've connected Zoom to the platform, a unique meeting link generates automatically for each booking.
- Add a form — collect name, email, company, and any qualifying questions before the booking confirms.
Pro tip: Add your scheduling link to your email signature, LinkedIn profile, and website contact page. Sales reps who embed booking links in outbound emails see 30-40% higher meeting conversion rates compared to "let me know your availability" messages.
Step 3: Set Up Round Robin for Team Scheduling
Round robin is where the scheduler becomes a genuine sales operations tool. Instead of manually assigning inbound leads, the platform distributes meetings across your team based on availability. This requires Sales Hub Starter or higher.
When creating a scheduling page, select "Round Robin" as the meeting type. Then add team members who should be in the rotation. The system shows prospects the combined availability of all reps — when someone books, it assigns the meeting to whichever rep is available at that time.
For teams with existing lead ownership rules, check the "Prioritize contact owner" box. This routes returning prospects to the rep who already owns the contact in the CRM — critical for maintaining relationship continuity in mid-funnel deals.
One limitation: the built-in round robin only supports two distribution methods — availability-based or contact-owner priority. If your team needs territory-based routing, weighted distribution, or qualification-based assignment, you'll need to layer in workflows or use a dedicated routing tool alongside your CRM.
Step 4: Configure Group Meetings for Multi-Stakeholder Calls
Group scheduling solves the "let me loop in my SE" problem. Instead of three separate email threads to coordinate a prospect, an account executive, and a solutions engineer, a group scheduling page only shows times when all required hosts are available.
To set this up, create a new scheduling page and select "Group" as the meeting type. Add the co-hosts. The platform cross-references everyone's connected calendars to display only overlapping availability. When booked, all hosts receive the calendar invite automatically.
This feature requires Sales Hub or Service Hub Starter at minimum. For enterprise teams running complex multi-department demos, group scheduling cuts average time-to-meeting by 2-3 business days compared to manual coordination.

Step 5: Automate Reminders and Follow-Ups
Booking the meeting is only half the battle. No-shows kill pipeline velocity. The platform's automation tools help you reduce no-shows and keep deals moving after the call.
Pre-meeting reminders:
The scheduler sends automatic confirmation emails when a meeting is booked. On paid tiers, you can customize reminder emails — send one 24 hours before and another 1 hour before. Include the meeting agenda, a brief intro about what you'll cover, and a reschedule link.
Post-meeting workflows:
Use CRM workflows to trigger actions after a meeting completes. Common automations include sending a follow-up email with next steps, updating the deal stage in your pipeline, creating a task for the rep to send a proposal, and notifying the sales manager in Slack.
These automations live in the Workflows tool (Marketing Hub or Sales Hub Professional and above). Even on Starter, the built-in confirmation and reminder emails handle the basics well.
Step 6: Embed Booking on Your Website
Sharing links via email works, but embedding the scheduler directly on your website captures inbound traffic while intent is high. The Hubspot platform offers two embedding options: an inline embed that renders the full booking widget on your page, and a pop-up embed triggered by a button click.
Navigate to your scheduling page, click the "Embed" tab, copy the code snippet, and paste it into your website's HTML. Place the embed on your pricing page, demo request page, or contact page — wherever qualified prospects are most likely to convert.
On the free tier, the embed includes platform branding. Starter plans and above let you remove the branding and customize colors to match your site. For full white-label control, you'll need Professional.

HubSpot Meeting Scheduler: Free vs. Paid Features
The pricing tiers determine which scheduling features you unlock. Here's the breakdown:
Free CRM (€0/month):
One scheduling page, one-on-one meetings only, basic form fields, confirmation emails, platform branding on the booking page.
Sales Hub Starter (€20/user/month):
Unlimited scheduling pages, round robin routing, group meetings, custom form fields, and removable branding.
Sales Hub Professional (€100/seat/month):
Everything in Starter plus advanced routing rules, workflow automations triggered by meeting events, custom reporting on meeting outcomes, and Sequences integration for automated outreach.
For solo reps or small teams testing the waters, the free tier is genuinely useful — not a crippled trial. You get full calendar sync, CRM contact creation, and a clean booking experience.
Most teams outgrow it when they need round robin or want to remove branding from client-facing pages.
5 Best Practices for Sales Teams Using the Scheduler
1. Create separate pages for each meeting type
A 15-minute qualification call and a 45-minute demo should have different scheduling pages with different availability rules. This keeps your calendar clean and sets clear expectations with prospects.
2. Always add buffer time
Set at least 15 minutes between meetings. Back-to-back calls without breaks lead to burnout and sloppy note-taking. The buffer setting in the scheduling page configuration handles this automatically.
3. Use qualifying questions in the form
Add 2-3 custom fields to the booking form — company size, current tool, and primary pain point. These populate the contact record automatically, giving your reps context before the call starts.
4. Connect Zoom or Teams before creating pages
The video integration generates unique meeting links per booking. Set this up first under Settings → Integrations so the option appears when configuring scheduling pages. Each booking gets a fresh link — no reused meeting rooms.
5. Track meeting outcomes in the CRM
After each call, log the outcome (completed, no-show, rescheduled) on the meeting record. Over time, this data reveals patterns — which lead sources convert to meetings, which reps have the lowest no-show rates, and where your pipeline bottlenecks live.

Breeze AI and the Future of Sales Scheduling
HubSpot's AI suite, Breeze, is reshaping how sales teams interact with the platform.
The Breeze Prospecting Agent can identify high-intent leads and trigger meeting requests automatically.
The Breeze Customer Agent handles inbound chat and can book meetings on behalf of reps — no human intervention needed for standard discovery calls.
For sales teams already on the platform, these AI capabilities layer on top of the existing scheduler. Your booking pages stay the same — Breeze just fills them faster by qualifying leads and scheduling meetings before a rep lifts a finger.
Frequently Asked Questions
Is the HubSpot meeting scheduler really free?
Yes. The free CRM includes one scheduling page with calendar sync, automatic contact creation, and confirmation emails. You only pay if you need team features like round robin, group scheduling, or custom branding — those start at €20/user/month on Sales Hub Starter.
Can I use the scheduler without using the full CRM?
Technically yes — you can sign up for a free Hubspot account and only use the meeting scheduler. But the real value comes from the CRM integration. Every booking automatically creates or updates a contact record, logs on the deal timeline, and feeds your sales reports. Using the scheduler without the CRM is like buying a sports car and only driving it in first gear.
How does round robin work in HubSpot?
Round robin creates a shared scheduling page where prospects see combined team availability. When someone books, the system assigns the meeting to the next available rep. You can also prioritize the existing contact owner so returning leads always meet with their assigned rep. This feature requires Sales Hub Starter or higher.
Does the scheduler work with Zoom and Microsoft Teams?
Yes. Connect Zoom or Teams under Settings → Integrations. Once linked, the scheduler generates a unique video meeting link for each booking automatically. Google Meet is also supported. The platform doesn't have built-in video — it relies on these third-party integrations.
What happens when someone books a meeting through the scheduler?
Hubspot creates (or updates) a contact record with the form data, logs the meeting on the contact and deal timeline, sends confirmation emails to both parties, adds the event to connected calendars, and generates a video link if Zoom or Teams is connected. All of this happens automatically — no manual entry required.
How do I reduce no-shows with the meeting tool?
Enable automated reminder emails (24 hours and 1 hour before the meeting), include a clear agenda in the confirmation, add a reschedule link so prospects can move instead of ghosting, and keep the time between booking and meeting short — ideally under 48 hours. Teams using all four tactics typically see no-show rates drop below 15%.
Sign up for HubSpot today to start booking more meetings.